Dvelopment

1 Account Settings
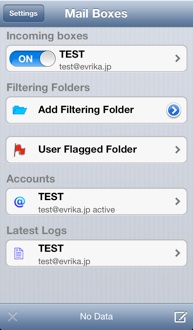
-Tap ”Settings” button at the top left.
You can also select the “Add Mail Account” cell when there is no account.
iPad版のスクリーンショット
このアプリケーションは、iPadのSplitViewの上で動作します。
iPad版は、iPhone版と同じ機能を持っています。

2 Add New Account
- Tap “+” button at the top left.
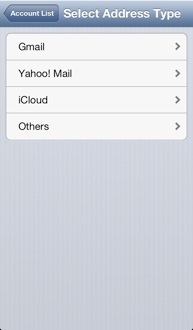
3 Select the Account type.
Select ”Others” if account is not Gmail,Yahoo! Mail or iCloud, either.

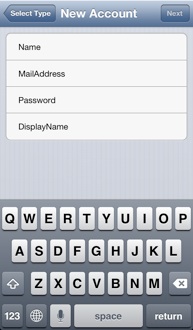
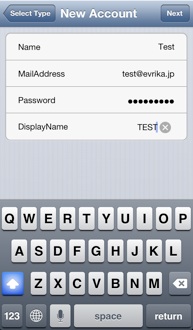
4 Input Account information
-Name This name will be used as a sender name in the sending mail.
-MailAddress MailAddress
-Password Password for POP and IMAP SMTP AUTH
-DisplayName This name will be used as account's name in this application.
Tap ”Next” button. (5)


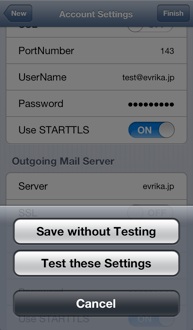
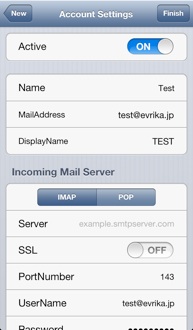
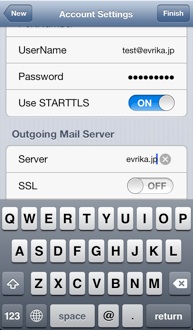
5 Input Account detail information
Incoming Mail Server and Outgoing Mail Server are required.
・Active Active or Inactive
This button synchronizes with On/Off button on the main menu.
・Name Name
・MailAddress Mail Address
・Password Password
・DisplayName DisplayName
Incoming Mail Server
・IMAP or POP
・Server Incoming Server Name or IP Address
・SSL Use this option if possible.
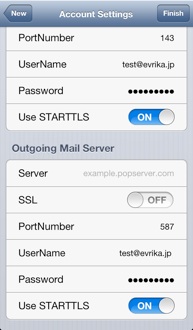
・PortNumber Port Number of Incoming Server
・UserName Username for Incoming Server
・Password Password for Incoming Server
・Use STARTTLS Use this option if possible.
Outgoing Mail Server
・Server Outgoing Server Name or IP Address
・SSL Use this option if possible.
・PortNumber Port Number of Outgoing Server
・UserName Username for Outgoing Server(SMTP AUTH)
・Password Password for Outgoing Server( SMTP AUTH)
・Use STARTTLS Use this option if possible.
Tap ”Finish” button
“Save without TEST” to add this account. (7)
“Test this Settings” to test these settings. (6)

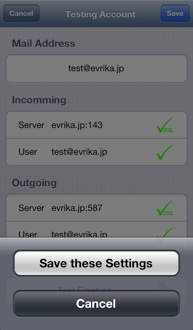
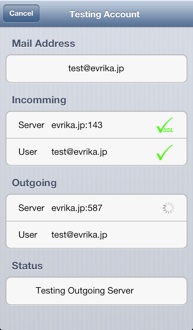
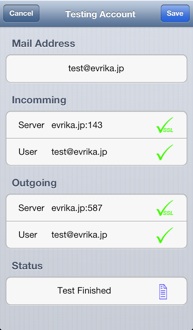
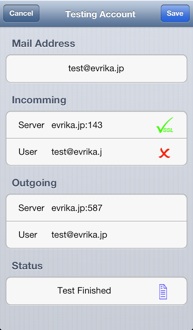
6 Test Account Settings
Test starts automatically.
Incoming
・Server Status of Incoming server connection
・User Status of authentication of Incoming server
Outgoing
・Server Status of Outgoing server connection
・User Status of authentication of Incoming server i if necessary
Status Test progress. You can see the test log when test is completed
Tap ”Save” button” when test is completed. (7)
Tap ”Cancel” button to cancel and modify settings. (5)

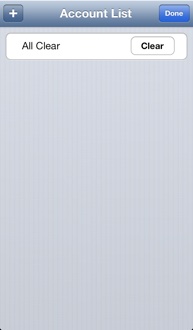
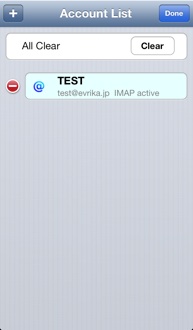
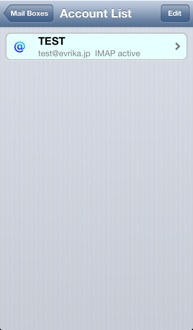
7 List of Accounts
Tap “+” button to setup another account if necessary. (3)
Tap ”Done” button to finish Account settings.
Tap “MailBoxes” button to return Main Menu
You can begin to receive e-mail to pull the table view down.


Software Evrikamail